3

3Installing Git

3.4

Changing the Git default settings

Git Bash starts life, well, looking like a colourful version of MS-DOS 6.2; and it works in much the same way—thank God it’s so easy to learn.

3.4.1

Configuring a Username and email address

Before we do anything else, we need to set ourselves up as a user on the local Git system. This means giving Git a user name and an email address.

The email address is purely an internal thing, Git will not use it as an actual email address, it will never send anything to it, try to verify it or pass it to any other party. It uses it to identify the user that has made a change to a file within a Git repository.

  • The username and email address supplied here don’t need to match the username and email account used to set up your GitHub account (see § 4.1)—they don’t need to, but in my case they do, it just make identifying who has made changes easier.

Start Git Bash and at the $ prompt enter the following commands:

$ git config --global user.name "your-username"

Don’t actually enter your-username, that would be silly. Enter the username you want to use. My username is practicalseries-lab so I entered:

$ git config --global user.name "practicalseries-lab"

You won’t get much of a response if you did it right, it just displays the $ prompt on the next line.

  • Git Bash does this a lot—no news is good news.
    If it hasn’t complained, it’s probably worked.
    “You are in a maze of twisty little passages, all alike”.

Next comes the email settings—in much the same way:

$ git config --global user.email "your-email"

In my case it’s:

$ git config --global user.email "lab@practicalseries.com"

These commands are great, so blindingly obvious—so easy to learn don’t you think?

This is what it looked like on my screen (Figure 3.25):

Figure 3.25 - Configure Username and Email

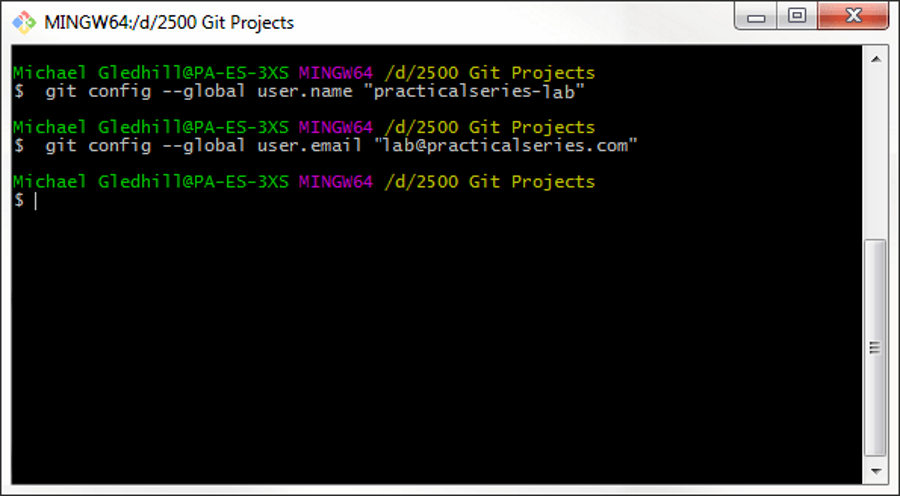
Figure 3.25   Configure Username and Email

How can I tell it’s worked? You ask.

The answer is you can’t, not yet, not until we’ve configured the text editor. That’s next:

3.4.2

Configuring a default text editor

I’m assuming you are going to use Notepad++ as the default text editor for Git Bash (this is the one I installed in § 3.2.1). Notepad++ works well with Git, some of the others (Brackets†1 for example) don’t work so well.

†1 Just to clarify; I’m using Brackets as the interface to Git. When I say Brackets doesn’t work with Git, I mean as a command line editor in Git Bash. Brackets and its extensions manage Git in the Brackets development environment very well.

Ok, you’ll like this; it’s a trip down memory lane. To make Notepad++ the default text editor for Git Bash we have to adjust the Windows Environment Variable. I think the last time I had to do this was when I was using WordPerfect 5.1 and Lotus 123. It was 1989, I was 23, MS-DOS was the operating system of choice, Margret Thatcher was prime minister and my children hadn’t been born—happy times.

Environment Variables (can’t believe I’m talking about this—it’s like talking about my Grandmother’s mangle or outside lavatories), they still exist in Windows, though most programmes just set them up as part of the installation process or use the registry instead. In Windows, Environment Variables describe the computer environment within which programmes run; they define common names (the name of the computer for example) and default file extensions.

The best known Environment Variable is PATH, this contains a list of directory paths. If a user types a command without specifying the path, the operating system will search the current directory and then each of the paths listed in the PATH environment variable trying to find it. Git Bash relies on the PATH environment variable to find any programme we wish to execute—of course it does, that’s what programmes did in the eighties.

Adding Notepad++ to the PATH Environment Variable

To make Notepad++ the default text editor for Git Bash, we must add the path to the notepad++ executable file to the PATH environment variable.

If you have a Notepad++ icon on your desk top, you can find the path by right clicking it and selecting properties. This opens the Shortcut dialogue box (Figure 3.26).

Figure 3.26 - Notepad++ path

Figure 3.26   Notepad++ path

The information we need is in the target box, it’s everything up to the last reverse oblique (i.e. everything but the filename), highlighted in blue in the above figure.

In my case (and probably your case too if you didn’t change where the programme was installed) it is:

C:\Program Files (x86)\Notepad++

Highlight it and copy it to the clipboard (ctrl+c).

Now to change the PATH Environment variable. To do this we need the system properties screen. On Windows 7, click the start button and then right click computer and select properties. On Windows 10, right click the start button and select system. Alternatively, use the shortcut win+pause/break (this is the Windows key and the pause/break key—top right of your keyboard), this works on either.

The system properties screen looks like this (Windows 7 left and Windows 10 right):

Figure 3.27 - System properties Windows 7

Figure 3.29   System properties Windows 7

Figure 3.28 - System properties Windows 10

Figure 3.28   System properties Windows 10

In either case, click advanced system settings and then click environment variables (this is much the same on Windows 7 and Windows 10), Figure 3.29.

Figure 3.29 - Select environment variables

Figure 3.29   Select environment variables

This opens the Environment Variable dialogue box:

Figure 3.30 - Select Path environment variable

Figure 3.30   Select Path environment variable

Again this looks pretty much the same in Windows 7 and Windows 10. In the lower window (system variables) scroll down until you find the path variable, highlighted in Figure 3.32.

Select the line and click edit—things are a little bit different now between Windows 7 and Windows 10. Windows 7 first:

Figure 3.31 - Windows 7 path variable

Figure 3.31   Windows 7 path variable

Figure 3.32 - Windows 7 modified path variable

Figure 3.32   Windows 7 modified path variable

In Windows 7 this opens a simple edit dialogue box (Figure 3.32). Click inside the variable value box and cursor right to the end of the line (by default the box will be showing you the end of the line—there will be a lot of stuff in there).

Add a semicolon (;) and then hit ctlr+v to past in the path copied from the Notepad++ shortcut properties (Figure 3.26). In my case (and probably yours) I added:

;C:\Program Files (x86)\Notepad++

Note the leading semicolon (this separates one path from another, see Figure 3.32).

That’s it, click ok repeatedly and close the System Properties window.

In Windows 10, thing are a bit easier. Clicking edit opens a slightly more intuitive edit dialogue box:

Figure 3.33 - Windows 10 modified path variable

Figure 3.33   Windows 10 modified path variable

Click new and paste the link in the empty line at the bottom (Figure 3.33).

Again, repeatedly click ok, close the System Properties window and we’re done.

Setting the Git Bash core text editor

Now if all that has worked, we can tell Git Bash to use Notepad++ as the default (core) text editor.

Start Git Bash and type the following easy to understand command:

$ git config --global core.editor "notepad++ -multiInst -nosession"

And that’s it—“has it worked?” You ask.

Well if it has worked when you type the following, you should see the global configuration file open in Notepad++ (this is the global file edit command, just go with it for now):

$ git config --global -e

The file is the .gitconfig file I talked about earlier (§ 3.3.1). It looks like this:

Figure 3.34 - gitconfig file in default text editor

Figure 3.34   gitconfig file in default text editor

Finally, we can see that the username and email is configured (§ 3.4.1) and that the core editor is set to Notepad++ (obviously, your file will have different user information).

While this file is open, there is something important to note:

If you look at your Git Bash window, it will look something similar to Figure 3.35:

Figure 3.35 - Git bash with open text editor

Figure 3.35   Git bash with open text editor

You can see that Git Bash has not returned with the $ prompt, Git Bash is waiting for the text editor to close and this is exactly what we want it to do. Generally, Git Bash should wait for the triggered application to finish before it moves on†2.

Close Notepad++ and Git Bash will return to normal with a $ prompt indicating it is waiting for your next instruction.

Now, I don’t know about you, but this stuff doesn’t seem that easy to learn to me. I’m not sure I agree with their statement “Git is easy to learn”.

†2 This is exactly what it didn’t do with Atom, it just dropped through to the $ prompt. I think this is a problem with Git (or Atom itself) running under Windows. It is for this reason that I’m not using Atom.

3.4.3

Configuring a default difference tool

If you didn’t install the difference and merge tool in § 3.2.2 then don’t bother doing this, skip to section 4.

When Git detects a conflict in a file (this happens when two different users have modified the same section of a particular file and Git doesn’t know which version to select, see § 2.4.1), it will try to display the conflict by using a difference or comparison tool. Git Bash has a rudimentary difference tool built into it, but it is limited and difficult to use.

To overcome this, we can configure Git Bash to use a third party difference tool, these generally have a graphical interface, accept the same arguments as the built in tool and are much easier to use.

In my case I use P4Merge, the thing we downloaded and installed in § 3.2.2.

To tell Git Bash to use P4Merge as its diff tool, enter the following commands:

$ git config --global diff.tool p4merge
$ git config --global difftool.p4merge.path "C:/Program Files/Perforce/p4merge.exe"
$ git config --global difftool.prompt false

You can cut and paste the commands from the above list. In Git Bash use:

  • shft+insert—insert selection from clipboard

  • ctrl+insert—copy selection to clipboard

  • In the second line, the path C:/Program Files/Perforce/p4merge.exe is the path to the P4Merge executable; it’s probably the same on your machine if you didn’t change the defaults. If you did you will have to type in the correct path for your PC.

Again note that in Git Bash, any Windows reverse oblique (\) in the path must be replaced by an oblique (/).

To see if all this has worked, look in the global configuration fie by typing:

$ git config --global -e

This time you should have:

Figure 3.36 - gitconfig file with diff tool configuration

Figure 3.36   gitconfig file with diff tool configuration

3.4.4

Configuring a default merge tool

The merge tool is going to be P4Merge (same as the difference tool), this is because the package does both functions. Merging is the process of resolving a conflict displayed with the diff tool; normally, this is by selecting one modification over another, again § 2.4.1.

The commands for setting the default merge tool are identical to those used to set the default diff tool, but use the word merge instead of diff. Enter the following:

$ git config --global merge.tool p4merge
$ git config --global mergetool.p4merge.path "C:/Program Files/Perforce/p4merge.exe"
$ git config --global mergetool.prompt false

Again to see the changes have been made, edit the global configuration file:

$ git config --global -e

Figure 3.37 - gitconfig file with diff and merge tool configuration

Figure 3.37   gitconfig file with diff and merge tool configuration

That’s all the default files set up.

3.4.5

Defining an alias

There’s one more thing to do. In Git bash, we can trigger Notepad++ just by typing its name at the $ prompt:

$ notepad++

But this is rather a lot to type each time. There is a fairly common abbreviation for Notepad++ and that is npp, better to just be able to type npp. To do this, we must assign an alias to notepad++.

Aliases are assigned in another of the Git Bash configuration files, this time it is a file called .bash_profile.

We’ll edit it from within Git Bash itself type:

$ notepad++ ~/.bash_profile

This will open or create the .bash_profile file in Notepad++ (it will be empty).

Add the following line:

alias npp='notepad++ -multiInst -nosession'

Save the file, close and restart Git Bash.

Now type:

$ npp

This will now open Notepad++.

The alias works by assigning a name (npp in this case) to a command and its argu-ments.


End flourish image