9

9GitHub

9.1

GitHub—the basic pages

Let’s have a look around the GitHub website. Log on to your GitHub profile. This will open your profile landing page—this is universally called the newsfeed page

9.1.1

GitHub profile—newsfeed page

My newsfeed page looks like this (well apart from the lines I’ve drawn all over it):

Figure 9.1 - GitHub—newsfeed page

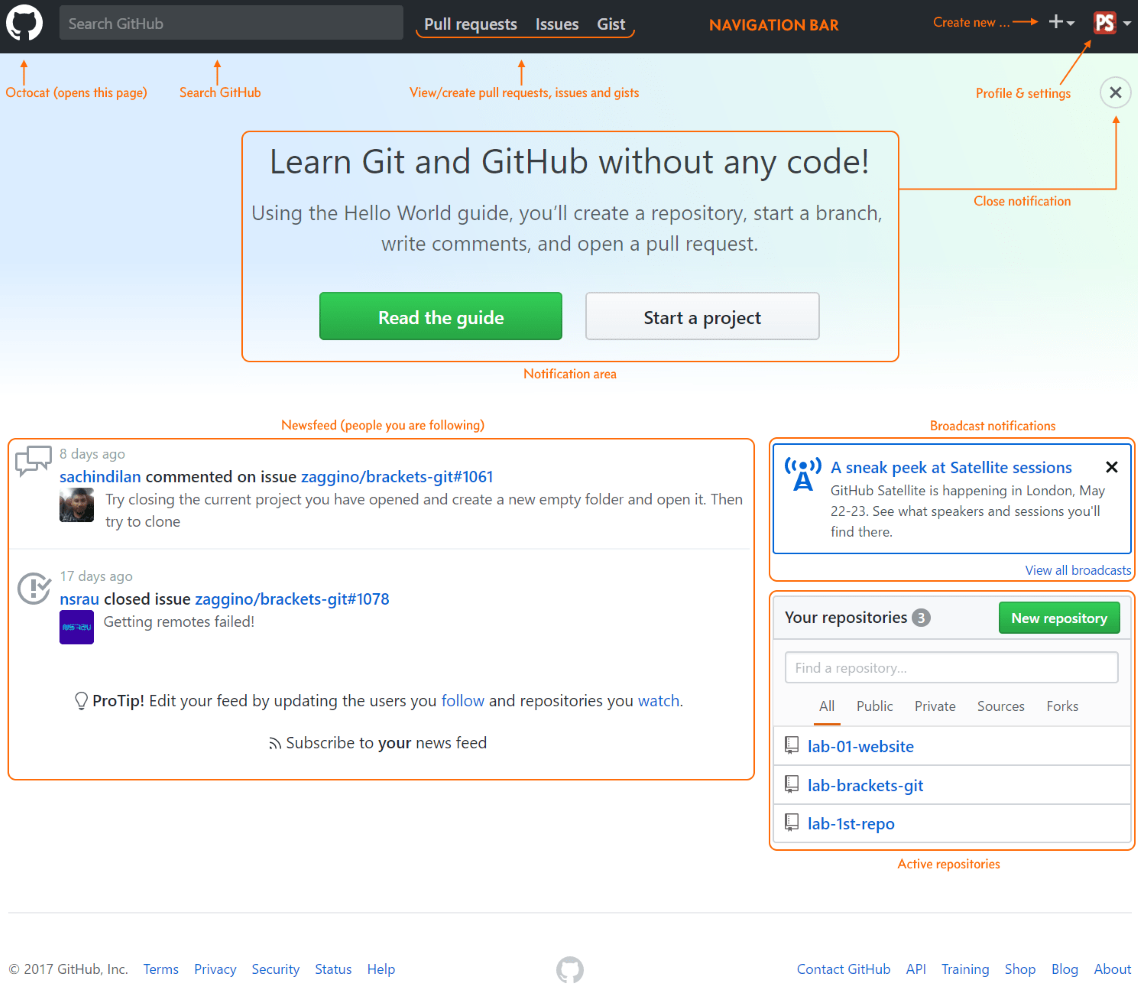
Figure 9.1   GitHub—newsfeed page

We’ve seen this page in the earlier sections, but I didn’t really explain it—let’s look through what we have:

Starting at the top with the navigation bar:

  • octocat icon—always takes you back to the newsfeed page (this page—Figure 9.1)

  • search github—searches GitHub for repositories and entries in README files

  • pulls and issues—I look at these in section 10

  • create new—create a new repository

  • your profile—view your profile and settings

The main area:

The top of the main area shows notifications, the one that is currently on the page “Learn Git...” is the default notification you get when you create a profile—I tend to close the notification area (click the cross indicated).

Broadcasts, are blogs and articles that GitHub thinks you might be interested in (again I close this box—I’m a right miserable bastard).

Newsfeed, this shows posts and activity by any user you might be following (watching in the creepy terminology of GitHub). If you view any GitHub user profile, you will be given the option to follow that user; similarly, if you view a particular repository, you can watch that repository. In either case, any relevant postings or activity will show on you newsfeed page.

  • A word of caution, once you follow people or repositories you will receive entries on you newsfeed page, you cannot get rid of these entries (even if you stop following that profile or repository).

Finally, the repositories; this is a list of your repositories and any other repositories that you may have copied (forked in GitHub’s vulgar parlance). This is a quick way to access your repositories or create a new one.

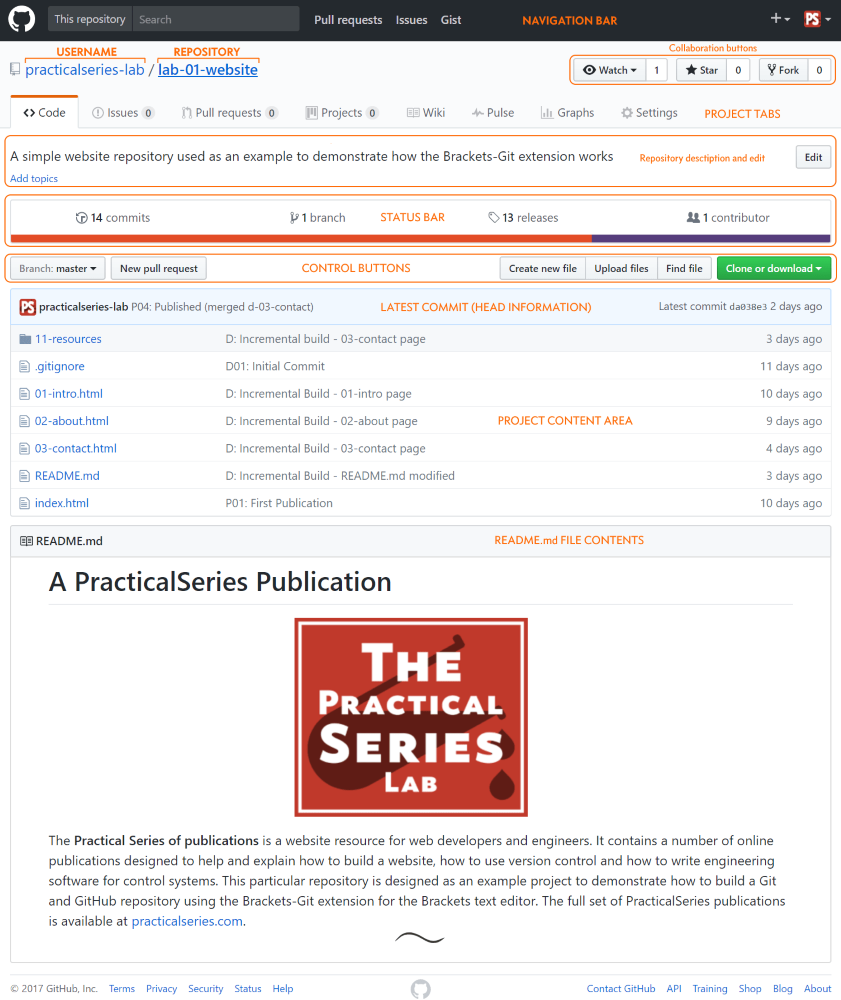
After I’ve simplified things, the PracticalSeries-lab newsfeed page looks like this:

Figure 9.2 - GitHub—tidied up newsfeed page

Figure 9.2   GitHub—tidied up newsfeed page

  • The entries in my newsfeed are from the Brackets-Git repository, I’m following it.

By and large, the newsfeed page is really only useful as a quick way to access your repositories.

Let’s look at a repository home page, click on the lab-01-website link in the your repositories section:

9.1.2

A repository home page

Clicking any repository link opens the home page for that repository; this is the lab-01-website home page:

Figure 9.3 - GitHub—repository home page

Figure 9.3   GitHub—repository home page

Starting at the top, the navigation bar, this is identical to that in § 9.1.1

The username link and the repository link navigate to the profile newsfeed page (Figure 9.1) and the repository home page (this page) respectively. These are quick links to return to the landing page for either the user or the repository—they are visible from most pages in a repository.

The project tabs allow the user to view the various aspects of the repository; these are covered in the following sections.

Beneath the project tabs is the project description (entered when the project was created). This description can be modified by clicking the edit button. The add topics link can be used to add keywords to the description; these keywords are used to make the repository more discoverable in GitHub searches

Following this is the status bar (I covered some aspects of this in § 8.3.2), I go through the more useful elements of this bar in this section and the next.

Next we have the control buttons, these allow various actions to be taken within the repository (change or create branches, create files &c.).

The head information shows the latest commit on the current branch; when it was made, who made it and the first line of the commit message. This is the pale blue band across the middle of the page.

Underneath this is the current repository directory (project content area). This allows files and folders to be opened and edited.

Finally, there is a preview of the README.md file in all its technicolour glory.

Some of this stuff we’ve already used and some of it is new. I’m not going to go through absolutely all of it (there is some stuff in there I’ve never even looked at), but I will cover the main bits in some detail in the following sections.


End flourish image